The post How to Set Up Sync in Vivaldi and Synchronize Your Browsing Data appeared first on BardTech.

Most major browsers offer some method for syncing browsing data between devices, and now Vivaldi has joined the crowd.
Vivaldi is a beautiful web browser for power users with a lot of features, including a customizable user experience, fast startup and page loading, quick commands, and notes. You should consider switching to Vivaldi if you haven’t already.
The Sync feature in Vivaldi is still in the experimental stage, but we found it to work well so far. You can download Vivaldi for Windows, Mac, and Linux. Vivaldi is not available on mobile devices but you can run Vivaldi on a Raspberry Pi 3 .
Today we’ll show you how to start using the experimental Sync feature.
What Does Vivaldi Actually Sync?
Currently, Vivaldi supports synchronizing the following items:
- Bookmarks
- Speed Dials
- Settings (Only some setting are currently synced. They are working on syncing additional settings.)
- Stored webpage passwords
- Stored autofill information
- History (Currently, only typed URLs are stored in History.)
- Remove Sessions (These allow you to access tabs open on other computers and we will show you how to access them.)
- Extensions
- Notes
Step 1: Enable the Sync Feature in Vivaldi
To enable the Sync feature, type the following in the address bar in Vivaldi and press Enter.
vivaldi://experiments
Then, check the Sync box on the Experimental Features page.

Step 2: Create a Vivaldi Account
To set up Sync, click the Vivaldi menu icon in the upper-left corner of the window. Then, go to Tools > Settings.
 Tools > Settings” width=”670″ height=”398″ />
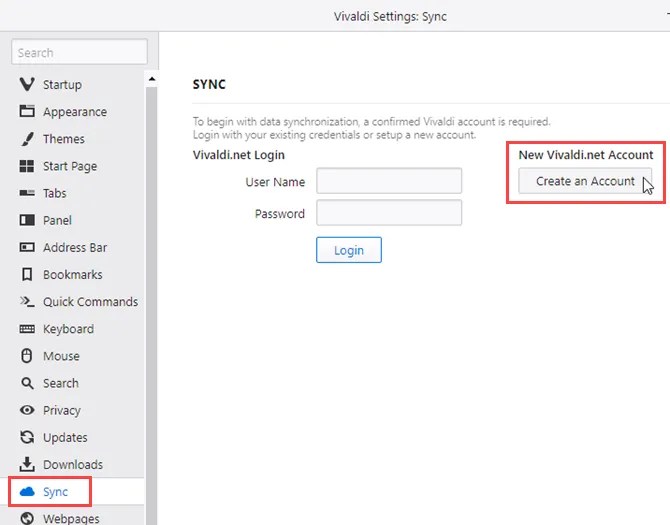
Click Sync in the left pane.
You need a Vivaldi account to use the Sync feature. If you don’t already have an account, click Create an Account.
Fill out the form on the Join the Vivaldi Community page.
Check the I have read and agree to the Terms of Use and Privacy Policy box and click Register.
You’ll receive an email asking you to verify your email address. Click the link in the email.

Step 3: Log Into Your Vivaldi Account
Once you’ve verified your email address, return to the Sync page in Vivaldi’s settings.
Enter the User Name and Password you chose during registration and click Login.

Step 4: Choose What to Sync and Enable Encryption
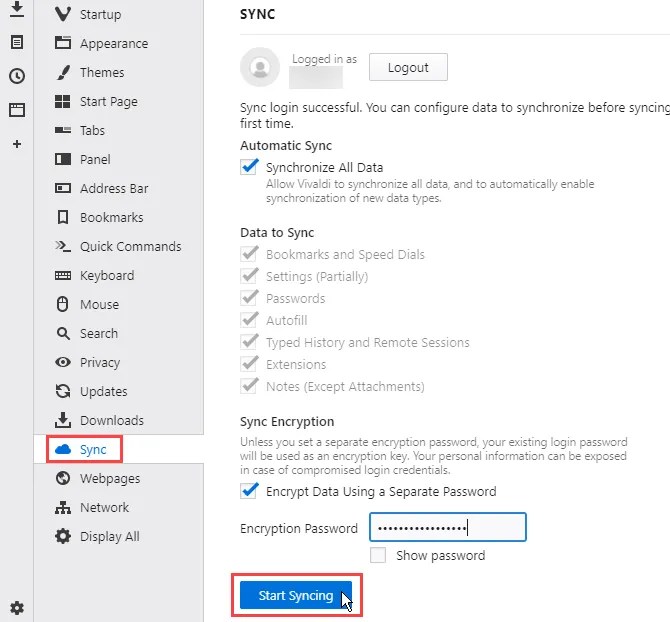
On the Sync page, Synchronize All Data is checked by default.
If you don’t want to sync all your data, uncheck the Synchronize All Data box. Then, uncheck the checkboxes under Data to Sync for any data you don’t want to sync.
For extra protection, in case your login credentials become compromised, check the Encrypt Data Using a Separate Password box under Sync Encryption.
Enter a password in the Encryption Password box. You must make your encryption password different from the password you chose for your Vivaldi.net account. Vivaldi won’t allow you to use the same password for both.
Click Start Syncing.
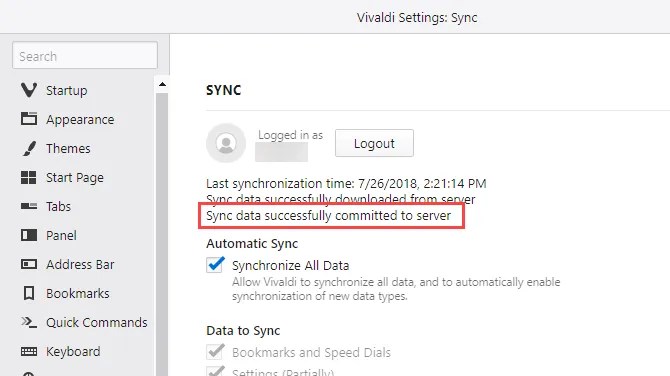
Some messages display at the top of the Sync settings page.
While the data is syncing, you’ll see a message saying, “Waiting for sync data to be committed.” When the sync process is finished, Vivaldi tells you, “Sync data successfully committed to server.”
Step 5: Decrypt the Data in Your Sync Account
If you’ve assigned an encryption password to your data in your Vivaldi.net account, you must enter your Encryption Password and click Decrypt when you log out and log back in.
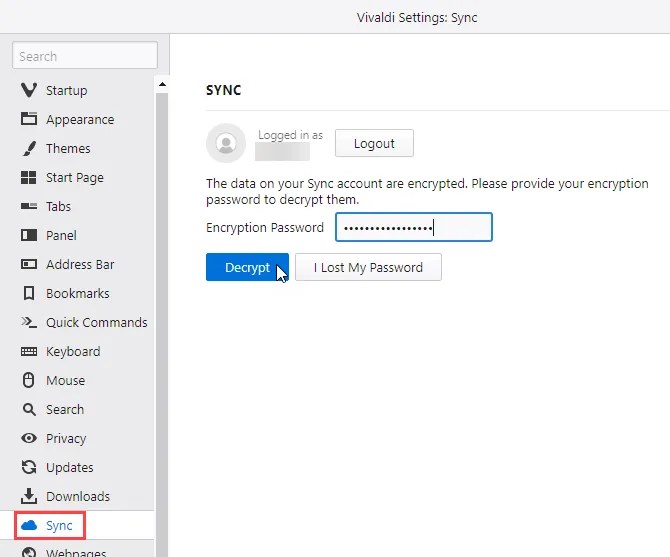
Then, choose what you want to sync again and click Start Syncing.

Step 6: Open Tabs From Other Synced Computers
Once your data is synced, you can access open tabs from Vivaldi running on another synced computer.
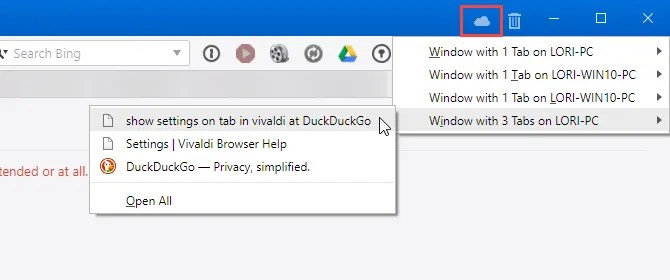
Click the cloud icon on the right side of the browser’s title bar and move your mouse over the computer with the tab you want to access. Then, click the tab you want to open from the submenu. You can also select Open All to open all tabs from the other computer.
How to Clear the Data From Your Vivaldi Account
Changing your password periodically is a good idea for keeping your data protected. To change the password on your Vivaldi.net account, you must clear the data from your account on the server.
To clear your data, go to Tools > Settings on the Vivaldi menu and then click Sync in the left pane.
Scroll down to the bottom of the Sync screen on the right and click Clear Data on Server.

Vivaldi wants to make sure you really want to clear your synced data.
If you’re sure, click Clear Sync Data on the Clearing Synchronized Data dialog box.

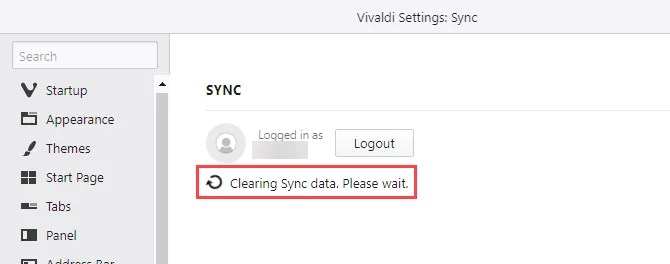
A message displays while your Sync data is cleared.
Now, you can log in to your account again and encrypt your data with a different password.
How to Reset and Restart Sync in Vivaldi
If you’ve cleared your Sync data from your account while you’re logged in on another computer, you’ll see the Sync Disabled dialog box when you open Vivaldi on the other computer.
You can log in again on the other computer and sync the data from that computer into your Vivaldi.net account.
Click Go to Sync Settings on the Sync Disabled dialog box.

You can sync again by clicking Restart Sync on the Sync settings screen.

If restarting sync doesn’t work, you can log out of your account.

Then, enter your User Name and Password and click Login.

If you’ve assigned an encryption password to your data in your Vivaldi.net account, you must enter your Encryption Password and click Decrypt when you log back in.
Then, choose what you want to sync again and click Start Syncing.

Vivaldi Sync: A Seamless Browsing Experience
If you’ve switched to Vivaldi from one of the other major browsers, and you’ve been missing the ability to sync your browsing data between computers, try Vivaldi’s Sync feature.
It works well so far. When you make a change to synced data on one computer, it’s quickly synced to your other computers that are signed in to your Vivaldi.net account.
Vivaldi is a capable Chrome alternative and it’s getting better every day. So what’s stopping you?
Read the full article: How to Set Up Sync in Vivaldi and Synchronize Your Browsing Data
The post How to Set Up Sync in Vivaldi and Synchronize Your Browsing Data appeared first on BardTech.
Tags: Browsers, Internet, Vivaldi Browser, browsing, synchronize, vivaldi
Original link: herevia BardTech
Comments
Post a Comment